Your PS2 spins the disc, sounds like it's working, then drops to the browser screen. Every. Single. Time. That's a PS2 disc read error, and it's the most common failure mode for PlayStation 2 consoles reaching 20+ years old. The KHS-400C laser assembly — Sony's workhorse optical pickup — degrades predictably, and replacement takes about 45 minutes with basic tools.
Why PS2 Lasers Fail After Two Decades
The PlayStation 2 sold over 155 million units, making it the best-selling console ever. That also means millions of aging laser assemblies hitting end-of-life simultaneously. The KHS-400C (fat PS2) and KHM-430 (slim PS2) lasers use infrared diodes that lose power output over time. Dust accumulation on the lens compounds the problem — each spec reduces light transmission, forcing the laser to work harder until it can't focus properly on DVD or CD layers.
Unlike cartridge-based systems covered in our Retro Console Plastic Restoration guide, disc-based consoles have mechanical failure points. The laser sled rides on grease-filled rails that dry out. The ribbon cable connecting the laser to the board develops hairline cracks. The potentiometer controlling laser intensity drifts out of spec. Any of these creates read errors, but the laser diode itself is the usual culprit.
Collectors face a specific problem: replacement lasers vary wildly in quality. Original Sony KHS-400C units are rare. Chinese aftermarket replacements range from acceptable to garbage. Proper diagnosis before ordering parts saves frustration and protects your console investment.
Diagnosing PS2 Disc Read Errors
Start with the simplest explanation. Clean the laser lens with a → Shop PS2 laser lens cleaner on Amazon or compressed air. If the console reads some discs but not others, that's often lens contamination, not laser failure.
Test with multiple disc types. The PS2 uses different laser intensities for CD-based PS1 games (780nm infrared) versus DVD-based PS2 games (650nm red). If it reads CDs but not DVDs, the red laser diode is failing. If it reads neither, the entire optical assembly needs attention.
Check the error pattern. Does it fail immediately, or does it read for 20 minutes then error out? Heat-related failures suggest the laser diode is borderline — it works when cold, fails when warm. That's terminal. Does it make repeated seeking sounds? The laser can't achieve focus lock. Does it spin up but never attempt to read? Check the ribbon cable and motor connections.
Open the console and inspect the laser assembly. You'll need a → Shop precision screwdriver set console repair on Amazon — the PS2 uses Phillips and Torx security screws. Look for:
- White residue on the laser lens (plastic degradation from the spindle)
- Dried grease on the laser rails (black or brown instead of clear)
- Cracks in the ribbon cable where it flexes
- Corrosion on the laser board contacts
Physical damage requires replacement. Dirty optics might respond to cleaning with → Shop isopropyl alcohol electronics cleaning on Amazon (99% only, never lower concentration).
PS2 Laser Model Differences and Compatibility
Sony used seven different PS2 motherboard revisions from 2000-2013. The laser assembly isn't universal across models.
| PS2 Model | Laser Assembly | Board Revision | Key Differences | |-----------|---------------|----------------|-----------------| | SCPH-10000 - 39004 (Fat) | KHS-400B/400C | GH-001 through GH-022 | 400B early Japanese models only, 400C standard worldwide | | SCPH-50000 - 50009 (Fat) | KHS-400C | GH-032 through GH-041 | Internal PSU, laser identical to earlier fat models | | SCPH-70000 - 79010 (Slim) | KHM-430AAA/430BAA | GH-051 through GH-070 | Ribbon cable routing different, not backward compatible | | SCPH-90001 - 90010 (Late Slim) | SPU-3170 integrated | GH-072 | Laser integrated into main board, unrepairable via standard replacement |
The KHS-400C is the most common replacement need. It's mechanically identical across SCPH-30000 through SCPH-50000 series, but the ribbon cable connector orientation changed with board revision GH-015. Check your motherboard stamping before ordering. Most aftermarket replacements include both cable types or use a universal connector.
Fat PS2 lasers swap directly between NTSC and PAL consoles — the regional lockout is firmware-based, not hardware. Slim PS2 lasers are region-locked by ribbon cable length and mounting bracket design. A SCPH-70004 (PAL) laser won't physically fit in a SCPH-77001 (NTSC) without modification.
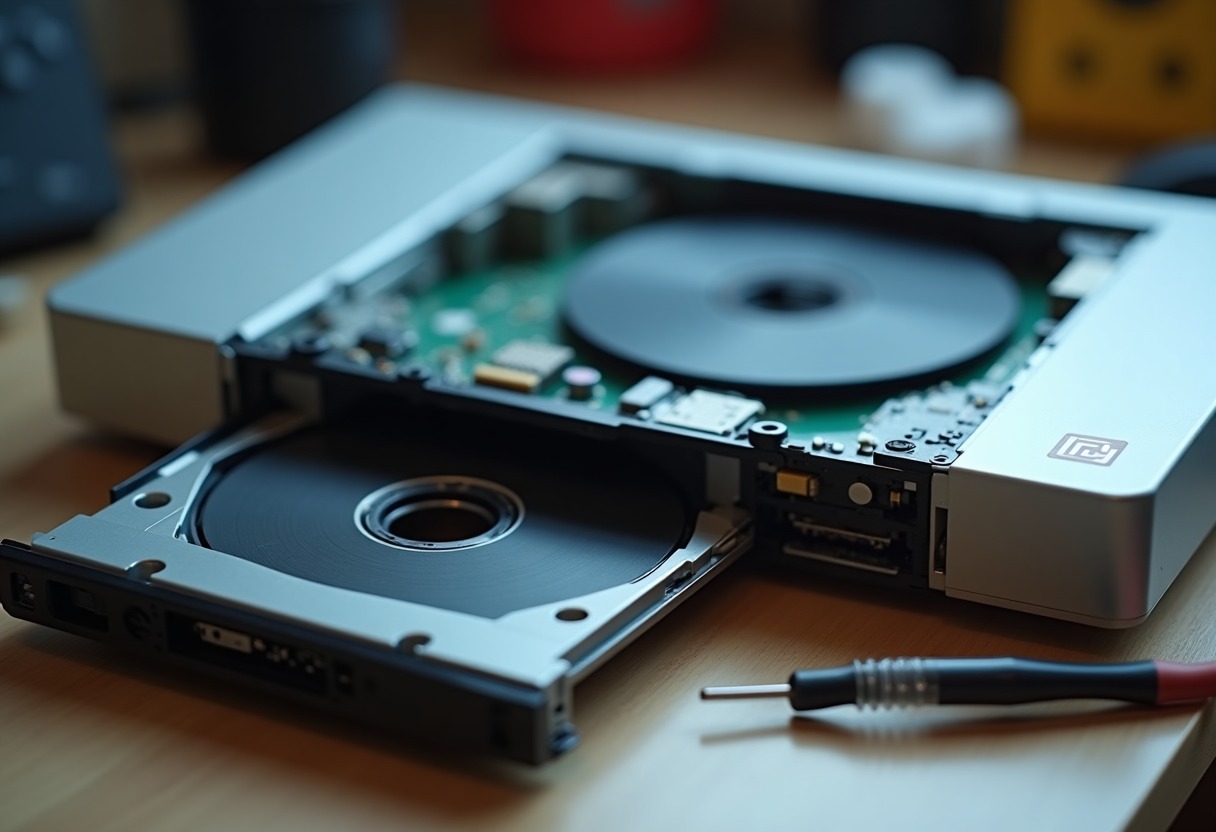
Complete PS2 Laser Replacement Procedure
Power down and unplug the console. Remove the bottom panel — eight Phillips screws on fat models, six on slim. Disconnect the power and data ribbon cables from the laser assembly. Note their orientation; phone photos help.
Remove the metal RF shield — four screws on fat models, two on slim. The laser assembly sits on a metal tray that slides on two rails. Remove the single screw securing the assembly to the tray. Gently slide the entire assembly toward the rear until it clears the front stop, then lift it out.
Disconnect the laser ribbon cable from the board. This is the fragile part — the locking clip on GH-022 and later boards flips up, but earlier boards use a sliding lock. Apply zero force to the cable itself. If the connector won't release easily, you're doing it wrong.
Clean the laser rails with isopropyl alcohol and a cotton swab. Apply fresh white lithium grease (not WD-40, not silicone spray — those attract dust). The laser needs to move smoothly but not freely slide under gravity.
Install the new laser assembly. This is where most replacements fail. Cheap aftermarket units arrive with the laser park position wrong. Before installing, manually slide the laser sled to the middle position — not fully forward, not fully rear. This prevents the motor from slamming against the stops on first power-up.
Connect the ribbon cable, ensuring it's fully seated. Reinstall the metal shield and bottom panel. Power on without discs first — you should hear the laser initialization routine (a single seek movement, about two seconds). If it makes repeated clicking or grinding sounds, power off immediately. The laser position is wrong or the motor is binding.
Laser Calibration and Optimization
New lasers rarely arrive calibrated correctly. The potentiometer on the laser board controls output intensity. Turning it clockwise increases power, counterclockwise decreases. Factory spec is around 100-200 mV for the focus error signal, but you need an oscilloscope to measure that accurately.
Collector-friendly calibration uses the "game loading time" method. Insert a known-working disc (preferably one that previously failed). If it loads but takes 30+ seconds to read the TOC, the laser is underpowered. Turn the pot 1/8 turn clockwise, test again. Repeat in 1/8 turn increments until load time drops to 10-15 seconds.
If the console reads CDs (PS1 games) but not DVDs (PS2 games), the laser is severely underpowered. Start at 1/4 turn clockwise. If it reads DVDs but skips or freezes during gameplay, you've overshot — back off 1/16 turn.
Too much power damages the laser diode faster and can burn the disc surface. If you exceed 1/2 turn clockwise from the starting position without improvement, the laser is defective. Don't cook it.
Post-calibration, test across multiple disc types. Blue-backed PS2 discs (early releases like Ridge Racer V) are notoriously finicky. DVD-9 dual-layer games stress the laser more than single-layer. Mix testing between PS1 CD games and PS2 DVD games to verify both wavelengths work properly.
Product Recommendations for PS2 Laser Replacement
Replacement laser assemblies: Buy from established sellers with return policies. The → Shop PS2 replacement laser on Amazon market is flooded with mixed-quality parts. Expect to pay $15-25 for aftermarket KHS-400C units. Original Sony pulls from donor consoles cost $40+ but have better longevity. Check seller feedback specifically mentioning PS2 lasers — general electronics sellers often ship wrong models.
Tool requirements: The precision screwdriver set linked earlier covers most needs, but add a Torx T10 bit for slim PS2 models. Anti-static wrist straps are overkill for laser replacement (no exposed board components), but helpful if you're doing multiple repairs. Magnetic tip screwdrivers make reassembly faster — those tiny screws vanish instantly on carpet.
Cleaning supplies: 99% isopropyl alcohol evaporates clean without residue. 70% leaves water spots that cause new read errors. Cotton swabs work for lens cleaning, but microfiber cloths are better for the rails and metal surfaces. Never use paper products inside the console — fiber contamination is real.
Thermal paste: Not directly laser-related, but if you're opening a fat PS2, replace the dried-out thermal paste on the GPU and Emotion Engine. Overheating causes secondary disc read errors that mimic laser failure. The console runs quieter and lasts longer with fresh paste.
Advanced Troubleshooting: Beyond the Laser
Sometimes the laser is fine — the problem is elsewhere. Fat PS2 consoles (SCPH-30001 through 39004) have a known issue with failing motor control chips. The BA6664FM IC on the board regulates laser motor speed. When it fails, the disc spins at incorrect RPM and the laser can't maintain focus. Symptoms match laser failure exactly, but replacing the laser doesn't help.
Test motor speed by observing disc rotation under load. It should start fast, stabilize at lower speed within 3-5 seconds, then maintain constant velocity. If it hunts (speeds up and slows down cyclically), the motor controller is failing. That's a surface-mount chip replacement requiring soldering skills and proper tools.
The disc tray sensor triggers read attempts. On slim PS2 models, this is a small mechanical switch that breaks after thousands of open/close cycles. When it fails, the console thinks the tray is always open and never attempts reading. You can bypass this by bridging the switch contacts, but that removes the safety interlock. Replacement switches cost $2 and snap in without soldering.
Ribbon cable failures create intermittent errors that appear random. The cable flexes every time the laser moves, and the copper traces crack after years of movement. You can't see the breaks — they're internal. If cleaning and laser replacement don't fix the problem, and you've confirmed the motor and sensors work, replace the ribbon cable. It's a $5 part that requires complete disassembly but fixes mysterious failures.
Fat PS2 models have the infamous "disc read error" firmware screen that collectors recognize instantly. That specific error (different from browser screen failures) indicates the console detected a disc but authentication failed. That's not the laser — it's the CD/DVD controller IC or its supporting components. Board-level repair territory.
Maintaining Restored PS2 Consoles
After successful laser replacement, treat the console gently. The new laser has the same failure modes as the original — it just hasn't accumulated 20 years of wear yet. Store the console horizontally in a low-dust environment. Vertical orientation increases wear on the laser mechanism.
Clean the lens every 100-150 hours of play. Compressed air works for loose dust; lens cleaning discs work for everything else. Never use the abrasive-pad style cleaning discs — they scratch the lens. Liquid-based cleaners are gentler.
Reduce laser strain by keeping disc surfaces clean. Our PlayStation 1 Disc Condition Grading Guide applies equally to PS2 games. Fingerprints, scratches, and label damage all force the laser to work harder achieving focus lock. Well-maintained discs extend laser life measurably.
The same restoration principles from our Best Retro Consoles 2026 guide apply here: environmental control matters. Heat cycles degrade plastic components and dry out lubricants. Keep your PS2 below 75°F during operation, ensure adequate ventilation, and never stack other equipment on top. The console generates significant heat from the power supply and CPU, and trapped heat accelerates failure across all subsystems.
For serious collectors maintaining multiple consoles, consider pairing your PS2 with proper display solutions from our Best Retro Gaming HDMI Adapters 2026 guide. Component cables maximize image quality and reduce eyestrain during long repair and testing sessions.
FAQ
How long does a replacement PS2 laser typically last? Aftermarket KHS-400C lasers average 800-1200 hours before noticeable degradation if properly calibrated. Original Sony units from donor consoles last longer (1500+ hours) but arrive pre-worn. Expect 2-4 years of moderate use before needing another replacement, assuming good maintenance and minimal dust exposure.
Can I clean the laser lens without replacing it? Yes, if contamination is the only problem. Use 99% isopropyl alcohol on a cotton swab, applying zero pressure to the lens surface. Let it air dry completely before testing. This fixes about 30% of read errors on consoles with working lasers but dirty optics.
Will a KHS-400B laser work in a SCPH-39001 console? No. The KHS-400B was Japan-only (SCPH-10000/15000) and uses different voltage specs. It physically fits but won't calibrate properly. You need a KHS-400C for all fat PS2 models SCPH-30000 and later. Mixing laser generations creates more problems than it solves.
Why does my PS2 read some games but not others after laser replacement? Selective reading indicates calibration problems or partially-failed replacement parts. Blue-backed discs and dual-layer DVD-9 games require stronger laser power than standard discs. Adjust the potentiometer 1/16 turn clockwise and retest. If DVDs still fail after 1/4 turn total adjustment, the replacement laser is defective.
Should I replace both CD and DVD lasers or just the failing one? The KHS-400C assembly contains both wavelengths in a single unit — you can't replace them separately. When you replace the entire optical pickup, you're getting fresh CD and DVD diodes regardless of which one failed. Slim PS2 models (KHM-430) work the same way.
A restored PS2 with a fresh laser reads like new — instant TOC recognition, fast load times, zero skipping during FMV sequences — and protects your game collection from the repeated insertion cycle that failed consoles demand.
Some links on this page are affiliate links. We may earn a small commission if you purchase through them, at no extra cost to you.
As an Amazon Associate we earn from qualifying purchases. This article contains affiliate links; if you buy through them we may earn a small commission at no additional cost to you.